Affiliate Disclosure: This article contains affiliate links. If you purchase through these links, I may earn a small commission at no extra cost to you. I only recommend products I trust and use myself.
How to Repot a Bonsai: Timing, Tools, and Technique
Bonsai repotting is one of the most important — and most misunderstood — practices in bonsai care. Done at the right time with the right tools, it rejuvenates your tree’s root system, improves nutrient uptake, and sets the stage for years of vigorous growth. Done carelessly, it can push a tree into severe stress or worse. In my twenty years of working with bonsai, I have repotted hundreds of trees — from young nursery stock to century-old pines — and every time, I approach it with the same deliberate calm.
In this guide, I will walk you through everything: when to repot, what tools you need, how to prune the roots, how to choose the right soil, and how to care for your tree in the critical weeks after repotting. Whether this is your first repot or your fiftieth, there is always something to refine in your practice.
Why Bonsai Repotting Matters
A bonsai lives in a very small container. Over time — typically two to five years depending on the species — the roots fill that container completely. When roots begin circling the perimeter of the pot, they can no longer absorb water and nutrients efficiently. The soil breaks down, drainage becomes poor, and the tree slowly weakens.
Repotting solves all of this at once. You trim the roots back, refresh the soil, and give the tree room to grow again. Think of it not as a disruption, but as a renewal — a chance to deepen your relationship with the tree and study its root health up close.
The first bonsai I ever repotted was a juniper I had been training for four years. When I lifted it from the pot, the root mass was so tight and compacted that you could turn it upside down and it held its shape like a brick. I spent two hours gently combing out the roots, pruning them back by a third, and setting the tree into fresh Akadama. That juniper is still with me today, twenty years later. It has never looked better.
When to Repot a Bonsai: Timing by Season and Species
Timing is everything in bonsai repotting. The universal rule: repot in early spring, just as the buds begin to swell but before new growth has fully emerged. At this stage, the tree is waking from dormancy. Its energy is mobilized and ready to repair root damage quickly. The foliage is not yet fully developed, so the tree is not under heavy transpiration demand.
Timing by Tree Type
- Deciduous trees (maples, elms, oaks): Early spring is ideal — just as buds begin to show green but before leaves fully unfurl. You can see the energy building in the tree. In mild climates, some deciduous species can be repotted in early fall as well.
- Conifers (junipers, pines, spruces): Late winter to very early spring is best, before candles extend. Pines in particular should be repotted when white buds appear but before needles separate. Avoid repotting pines in fall — their slow recovery rate makes this risky.
- Tropical and subtropical trees (ficus, serissa, carmona): These can be repotted at almost any time of year, as long as temperatures remain warm. Avoid repotting during cold snaps or the dead of winter unless you have a heated greenhouse.
- Flowering trees (azalea, wisteria): Repot azaleas immediately after flowering. Wisteria is best done in early spring before flowering, or in early summer after blooms fade.
How Often Should You Repot?
This depends on the age and vigor of the tree:
- Young, fast-growing trees: Every 1–2 years
- Mature, established trees: Every 3–5 years
Do not repot on a fixed schedule. Each spring, gently lift the tree from its pot and examine the roots. If roots are circling the perimeter and filling the pot, it is time. If the root ball still has loose soil around it, return the tree to its pot and check again next year. The tree will tell you when it is ready.
According to the British Bonsai Association and resources from Bonsai Empire, root-bound trees that go too long without repotting show reduced vigor, yellowing foliage, and dramatically reduced water uptake — signs that are often mistaken for overwatering or disease.
Tools You Need for Bonsai Repotting
Having the right tools makes the process cleaner, faster, and less traumatic for the tree. Here is what I use:
- Root hook or chopstick: For gently combing out the root ball and loosening old soil. A dedicated bonsai root hook gives you far more control than a chopstick, though both work.
- Bonsai scissors or root pruning shears: Sharp, clean cuts minimize root damage. Dull tools crush rather than cut, creating entry points for disease. A quality bonsai tool kit typically includes root scissors, concave cutters, and wire cutters — everything you need for repotting and beyond.
- Mesh screens: To cover drainage holes and keep soil in the pot while allowing water through.
- Aluminum wire: To anchor the tree in its new pot during the critical rooting period.
- A clean work surface: Old newspaper or a potting tray keeps the mess manageable.
Choosing the Right Bonsai Soil
Soil is arguably the most important decision in repotting. The wrong soil — particularly organic potting mix — retains too much moisture, leading to root rot and anaerobic conditions that suffocate the roots. Proper bonsai soil is coarse, well-draining, and slightly moisture-retentive.
The standard mix recommended by most bonsai practitioners and the Bonsai Empire soil guide is:
- Akadama (fired Japanese clay): provides structure and moisture retention
- Pumice: improves drainage and aeration
- Lava rock: further drainage and anchoring
Mix these in a 1:1:1 ratio for most trees. Increase Akadama for trees that prefer more moisture (tropical species), or increase pumice and lava rock for trees that prefer excellent drainage (pines, junipers). You can find quality Akadama bonsai soil online — look for fired, double-hardness Akadama for better longevity.
Step-by-Step Bonsai Repotting Technique
Follow these steps slowly and methodically. There is no rushing this process.
-
Remove the Tree from Its Pot
Gently run a root knife or a flat tool around the inside edge of the pot to loosen the root ball. Tip the pot and ease the tree out — do not yank. If it resists, work the tool around again. If wire anchors were used in the previous repot, cut them first.
-
Comb Out and Expose the Roots
Using your root hook or chopstick, gently tease the roots outward from the root ball. Work from the bottom and sides. Remove as much of the old soil as possible without tearing roots. You want to see the full root structure — this is your diagnostic moment. Healthy roots are white to light tan. Dark, mushy, or foul-smelling roots are rotted and must be removed.
-
Prune the Roots
This is the heart of bonsai repotting. Using sharp scissors, trim the roots back so the root ball fits comfortably in the pot with 1–2 cm of space on all sides and at the bottom.
Key rule: Never remove more than one-third of the total root mass in a single repot. For trees in poor health, remove even less — 15–20% maximum. The roots feed the foliage; remove too much and the tree cannot sustain its canopy. If the tree is severely root-bound and you need to remove more, consider doing it over two repotting sessions one year apart.
Cut the thicker downward-growing roots (tap roots) close to the trunk to encourage a flat, radial nebari (surface root structure). Preserve the fine feeder roots as much as possible — they are the tree’s primary absorbers.
-
Prepare the New Pot
Cover the drainage holes with mesh. Thread anchor wires up through the holes. Add a thin layer of coarse soil to the bottom — this aids drainage at the root zone. Then add a mound of your prepared soil mix in the center, shaped so the tree will sit at the correct height and angle.
If you are selecting a new pot, choose one that is roughly two-thirds the length of the tree’s canopy and deep enough to accommodate the root ball. Oval or rectangular pots for deciduous trees; round or square pots for conifers. A well-chosen ceramic bonsai pot enhances the composition as much as the tree itself.
-
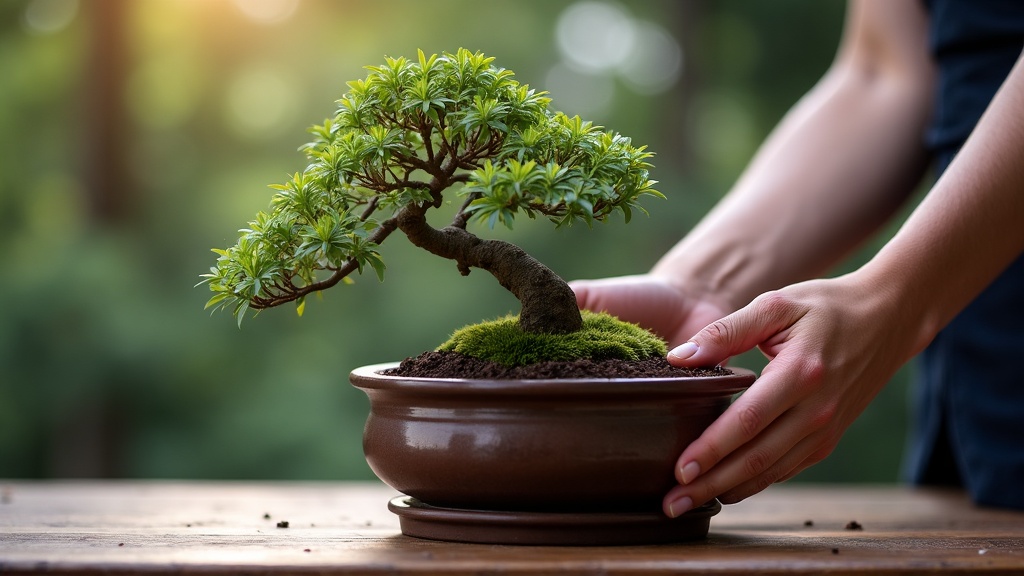
Position and Secure the Tree
Set the tree on the soil mound. Adjust the angle and position until you find the composition you want — this is the moment to refine the front and viewing angle. Twist the anchor wires over the root ball and secure them firmly. The tree should have zero movement. An unstable tree cannot establish new root contact with the soil.
-
Fill in with Fresh Soil
Work soil in around the roots using a chopstick or root hook, pushing it into all the gaps and air pockets. This is critical — air pockets around the roots prevent root-soil contact and cause roots to dry out and die. Work the soil in from multiple angles, tamping it gently as you go.
-
Water Thoroughly
Immediately after repotting, water the tree thoroughly until water runs freely from the drainage holes. Water settles the soil further and removes air pockets. Then water again. Place the tree in a sheltered location and allow the excess to drain completely.
Aftercare: The Critical 4–6 Weeks
Repotting is only half the work. What you do afterward determines whether the tree thrives or struggles.
- Shade and shelter: For the first 2–4 weeks, keep the tree out of direct midday sun. A location with bright, filtered light reduces transpiration stress while the roots recover. Full sun on a freshly repotted tree — with a compromised root system — can cause rapid wilting and dieback.
- Watering: Water when the top layer of soil just begins to dry, but do not let the root ball dry out completely. The new soil will drain faster than the old compacted mix — adjust your watering frequency accordingly. Check moisture by pushing a finger or chopstick into the soil.
- No fertilizer for 4–6 weeks: The root system needs time to heal before it can process fertilizer. Applying fertilizer too soon can burn vulnerable roots. After 4–6 weeks, when you see new growth emerging, begin with a gentle, balanced fertilizer at half strength.
- No major pruning: Let the tree recover. Avoid removing significant foliage for at least a month after repotting. The canopy is the tree’s energy factory — it needs every leaf to fuel root regeneration.
- Watch for root shock: Signs include sudden leaf drop, wilting that does not respond to watering, or yellowing of new growth. If you see this, move the tree to deep shade, mist the foliage lightly, and stop all fertilizing. Most trees recover with time and patience.
Frequently Asked Questions About Bonsai Repotting
Can you repot a bonsai in summer?
Generally, no. Summer repotting is high-risk because the tree is under full transpiration demand — all its leaves are active and pulling water. If the root system is disrupted, the tree cannot keep up. Emergency repotting (to deal with root rot or a broken pot) is acceptable in summer, but should be done minimally and followed by immediate shade and careful watering. Tropical bonsai can tolerate summer repotting better than temperate species.
How do I know if my bonsai needs repotting?
The definitive test: in early spring, gently remove the tree from its pot. If roots are circling the perimeter, filling all available space, or emerging from the drainage holes, it is time. Other signs include water that runs off the surface without absorbing, soil that dries out extremely fast, and reduced vigor or yellowing despite correct watering and fertilizing.
Should I repot a newly purchased bonsai?
If the tree came in poor organic potting soil (often the case with imported or mass-market bonsai), yes — repot in the next available spring into proper bonsai substrate. If it came in a well-draining mineral mix, wait and observe. Repotting too soon after purchase adds stress on top of the transport stress the tree already experienced.
How much root can I safely remove?
The standard guideline is no more than one-third of the total root mass per repotting session. For healthy, vigorous trees in peak spring condition, you can approach this limit confidently. For older trees, trees in poor health, or trees being repotted outside the ideal spring window, be more conservative — 15–20% is safer.
Do I need to sterilize my tools before repotting?
Ideally, yes. Wiping cutting tools with isopropyl alcohol between trees prevents transmitting fungal or bacterial pathogens from one tree to another. It is especially important if you are working with multiple trees in a session, or if you suspect any root disease. Sharp, clean tools also make cleaner cuts that heal faster.
Final Thoughts from Kenji
Bonsai repotting is an act of trust — between you and the tree. The tree cannot tell you when it is ready, what it needs, or how it feels. You have to learn to read the signs: the swelling buds in March, the circling roots, the slowing growth. This is the study of a lifetime, and each repotting session teaches you something new.
Do not let fear of “doing it wrong” keep you from repotting. A tree that has outgrown its pot will suffer more from neglect than from a careful repotting done a few weeks early. Start with the right timing, invest in proper soil and tools, and work slowly. The trees are more resilient than we give them credit for.
If you are just starting out, consider picking up a quality bonsai repotting tool kit — having the right instruments from the beginning makes every session cleaner and more enjoyable. And if you are ready to upgrade your soil regimen, a bag of quality Akadama is one of the best investments you can make in your trees’ long-term health.
May your roots find good soil, and your practice grow deeper with every season.
— Kenji

About Kenji
Bonsai Practitioner & Teacher — 20 Years
Kenji has practiced bonsai for over 20 years, training under master practitioners in Osaka and Kyoto before bringing his craft to Seattle. He approaches bonsai as a meditative discipline rooted in patience, observation, and deep respect for the natural world. Read more about Kenji
About Kenji
Bonsai Practitioner · 20 Years
20 years practicing bonsai. Trained under master practitioners in Osaka and Kyoto. I write about the patient art of shaping trees — technique, aesthetics, and the wabi-sabi philosophy behind it. Read more →